
Manage dimensions within a design.
You can manually add dimensions to your Fusion FX design or Fusion FX can do this for you automatically. Dimensions can be dynamically updated whilst a design is being created. There are options for hiding and showing dimensions and selecting which item categories are dimensioned automatically.
Along with dimensions, you can display guide rails, witness lines, order codes or heights from floor, or you can hide all dimensions completely from the view.

PREFERENCES The default values for dimension options can be set in Fusion FX preferences.
What do you want to do?
- Show or hide dimensions
- Automatically add dimensions to your design
- Automatically add dimensions whilst designing
- Show or hide installation dimensions
- Automatically add installation symbol dimensions in elevation view
- Automatically add installation symbol dimensions whilst designing
- Add dimensions to your design
- Add a dimension rail to the edge of an item
- Add a dimension rail between two points
- Add horizontal and vertical dimension rails between two points
- Add multiple horizontal dimension rails in elevation view
- Add multiple vertical dimension rails in elevation view
- Add a guide rail to the edge of an item
- Add a guide rail between two points
- Add horizontal and vertical dimension rails from the centre of an item
- Add horizontal and vertical installation symbol dimension rails from the centre of an item
- Align dimension values to dimension rails
- Change the dimension rail gap size
- Change the end style of dimension rails
- Change the style of witness lines
- Change a dimension value
- Change advanced options for dimension rails
- Move a dimension rail
- Move a dimension rail value
- Delete dimension rails
- Change the dimension category of an item
Show or hide dimensions
- On the Annotate tab, in the Dimensions group, open the Item Settings list option.

- Beneath the Rail Options heading, select or clear the Dimensions option.
PREFERENCES The default values for Item Settings options can be set in Fusion FX preferences.
 TOP OF PAGE
Automatically add dimensions to your design
- On the Annotate tab, in the Dimensions group, open the Item Settings list option, to define how standard dimensions should be displayed.
- Click Items.
PREFERENCES The default values for Item Settings options can be set in Fusion FX preferences.
Automatically add dimensions whilst designing
- On the Annotate tab, in the Dimensions group, click the Auto Items option, to enable or disable automatic dimensioning mode.
NOTE Fusion FX automatically uses the current dimension options defined as well as those set within the Item Settings option lists.
PREFERENCES The default state for automatic dimensions can be set in Fusion FX preferences.
Show or hide installation dimensions
- On the Annotate tab, in the Dimensions group, open the Symbol Settings list option, to define how installation symbol dimensions should be displayed.
- Beneath the Rail Options heading, select or clear the Dimensions option.
PREFERENCES The default values for Item Settings options can be set in Fusion FX preferences.
Automatically add installation symbol dimensions in elevation view
- On the Annotate tab, in the Dimensions group, click the Auto Symbols option, to enable or disable automatic dimensioning mode.
NOTE Fusion FX automatically uses the current dimension options defined as well as those set within the Item Settings option lists.
PREFERENCES The default state for automatic dimensions can be set in Fusion FX preferences.
Automatically add installation symbol dimensions whilst designing
- On the Annotate tab, in the Dimensions group, click the Auto Symbols option, to enable or disable automatic dimensioning mode.
NOTE Fusion FX automatically uses the current dimension options defined as well as those set within the Item Settings option lists.
PREFERENCES The default state for automatic dimensions can be set in Fusion FX preferences.
Add dimensions to your design
As well as adding dimensions to a design automatically, you may want to create your own. These dimensions can be associated to any items in the design or they can be 'free' dimensions.
- On the Annotate tab, in the Dimensions group, use any of the 9 commands to manually configure your own dimensions.
- Deselecting all of these commands will allow any dimension to be selected for editing purposes.
Add a dimension rail to the edge of an item
- On the Annotate tab, in the Dimensions group, click the Dimension Selected Line option.
- A dimension rail is created by clicking on the edge of an item in the design.
NOTE Fusion FX creates a dimension rail associated with that item. Deleting the item also deletes its associated rails.
Add a dimension rail between two points
- On the Annotate tab, in the Dimensions group, click the Dimension 1st to 2nd Click option.
- A dimension rail is created by clicking the point at which you want to start the dimension rail followed by clicking the point at which you want to end the dimension rail.
NOTE Fusion FX will snap to the corner of an item if Item Snapping is on and you click near to the corner of an object.
Add horizontal and vertical dimension rails between two points
- On the Annotate tab, in the Dimensions group, click the Dimension Right Angle option.
- Dimension rails are created by clicking the point at which you want to start the dimension rails followed by clicking the point at which you want to end the dimension rails.
NOTE Fusion FX will snap to the corner of an item if Item Snapping is on and you click near to the corner of an object.
Add multiple horizontal dimension rails in elevation view
- On the Annotate tab, in the Dimensions group, click the Dimension Horizontal Multi-Point option.
- Multiple dimension rails are created by clicking the first point at which you want to start the first dimension rail, and additional clicks will create further dimension rails.
- To stop creating further dimension rails, double-click the mouse, click outside the window or select Esc on the keyboard.
NOTE Pressing Delete on the keyboard will delete the last selection point. Fusion FX will snap to the corner of an item if Item Snapping is on and you click near to the corner of an object.
Add multiple vertical dimension rails in elevation view
- On the Annotate tab, in the Dimensions group, click the Dimension Vertical Multi-Point option.
- Multiple dimension rails are created by clicking the first point at which you want to start the first dimension rail, and additional clicks will create further dimension rails.
- To stop creating further dimension rails, double-click the mouse, click outside the window or select Esc on the keyboard.
NOTE Pressing Delete on the keyboard will delete the last selection point. Fusion FX will snap to the corner of an item if Item Snapping is on and you click near to the corner of an object.
Add a guide rail to the edge of an item
- On the Annotate tab, in the Dimensions group, click the Guide Rail Selected Line option.
- A guide rail is created by clicking on the edge of an item in the design.
NOTE Fusion FX creates a guide rail associated with that item. Deleting the item also deletes its associated rails.
Add a guide rail between two points
- On the Annotate tab, in the Dimensions group, click the Guide Rail 1st to 2nd Click option.
- A guide rail is created by clicking the point at which you want to start the guide rail followed by clicking the point at which you want to end the guide rail.
NOTE Fusion FX will snap to the corner of an item if Item Snapping is on and you click near to the corner of an object.
Add horizontal and vertical dimension rails from the centre of an item
- On the Annotate tab, in the Dimensions group, click the Dimension Centreline option.
- Dimension rails are created by clicking the centre point of an item followed by clicking the point at which you want to end the dimension rails.
Add horizontal and vertical installation symbol dimension rails from the centre of an item
- On the Annotate tab, in the Dimensions group, open the Dimension Centreline list option and click Installation Dimension Centreline.
- Dimension rails are created by clicking the centre point of an installation symbol followed by clicking the point at which you want to end the dimension rails.
Align dimension values to dimension rails
- On the Annotate tab, in the Rail Configuration group, click the Align Values option, to align each dimension value to its associated rail.
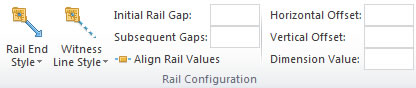
PREFERENCES The default state for the Align Values option can be set in Fusion FX preferences.
Change the dimension rail gap size
- On the Annotate tab, in the Rail Configuration group, specify values for the Initial Gap and Subsequent Gap for all dimension rails.
- Click Items.
NOTE If automatic dimensioning mode is enabled the Initial Gap and Subsequent Gap changes are applied automatically.
PREFERENCES The default values for the Initial Gap and Subsequent Gap can be set in Fusion FX preferences.
Change the end style of dimension rails
- On the Annotate tab, in the Rail Configuration group, open the Rail End Style list option.
- Click one of the Rail End Styles options to update the style of all dimension rails.
PREFERENCES The default Rail End Styles can be set in Fusion FX preferences.
Change the style of witness lines
- On the Annotate tab, in the Rail Configuration group, open the Witness Line Style list option.
- Click one of the Witness Line Style options to update the style of all witness lines.
PREFERENCES The default Witness Line Style can be set in Fusion FX preferences.
Change a dimension value
- Click a dimension rail in the design.
- On the Annotate tab, in the Rail Configuration group, specify a new Dimension Value.
Change advanced options for dimension rails
- On the Annotate tab, in the Dimensions group, click the Dimension Dialog Box Launcher.
- Advanced options for dimension rails are available.
PREFERENCES The default states for all advanced options can be set in Fusion FX preferences.
Move a dimension rail
- Click a dimension rail in the design.
- Whilst holding the mouse button, drag the dimension rail to a new position.
Move a dimension rail value
- Click a dimension rail in the design.
- On the Annotate tab, in the Rail Configuration group, specify new values for the Horizontal Offset and Vertical Offset.
Delete dimension rails
- Click a dimension rail in the design.
- On the Home tab, in the Editing group, click the Delete option.

NOTE Multiple dimension rails can be selected by holding down the Shift key whilst clicking dimension rails in the design.
Change the dimension category of an item
- Select the item you wish to change the dimension category for.
- On the Items tab, in the Properties group, open the Dimension list option.

- Select the desired dimension category.
NOTE the item's original dimension category as specified in the catalogue, will be indicated by a *.